Welcome to my fun and easy guide on how to make a bottle mockup.
Don’t worry if you’re new to this – I’ll guide you every step of the way.
Our main focus?
Placeit – an incredibly user-friendly online mockup generator that makes the process quick, simple, and accessible for everyone, no design skills required.
I’ll show you how to create a professional-looking bottle mockup in just a few clicks.
Yes, it’s really that easy.
But if you’re feeling adventurous and want more creative control, I’ve also got you covered.
I’ll include a quick Photoshop tutorial to help you craft a custom bottle mockup from scratch.
By the end of this guide, you’ll be whipping up bottle mockups like a PRO – no stress, no complicated software, just awesome results.
This post covers:
- How to make a bottle mockup with a mockup generator
- How to make a bottle mockup with Photoshop
- Conclusion: Master making bottle mockups!
- FAQs about making a bottle mockup
How To Make A Bottle Mockup With A Mockup Generator
Creating a bottle mockup with an online mockup generator like Placeit is a straightforward and fun process.
Here’s a step-by-step tutorial to guide you through it:
Step 1: Visit Placeit
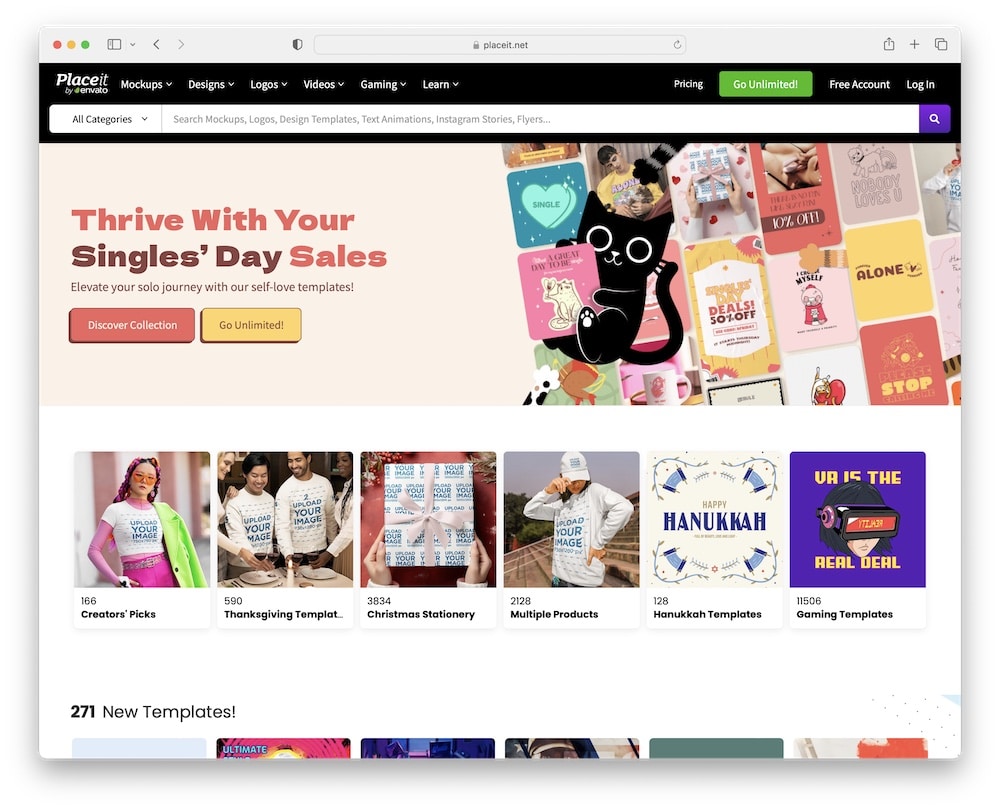
Navigate to Placeit: Open your web browser and go to the Placeit website.
Step 2: Choose A Bottle Mockup Template
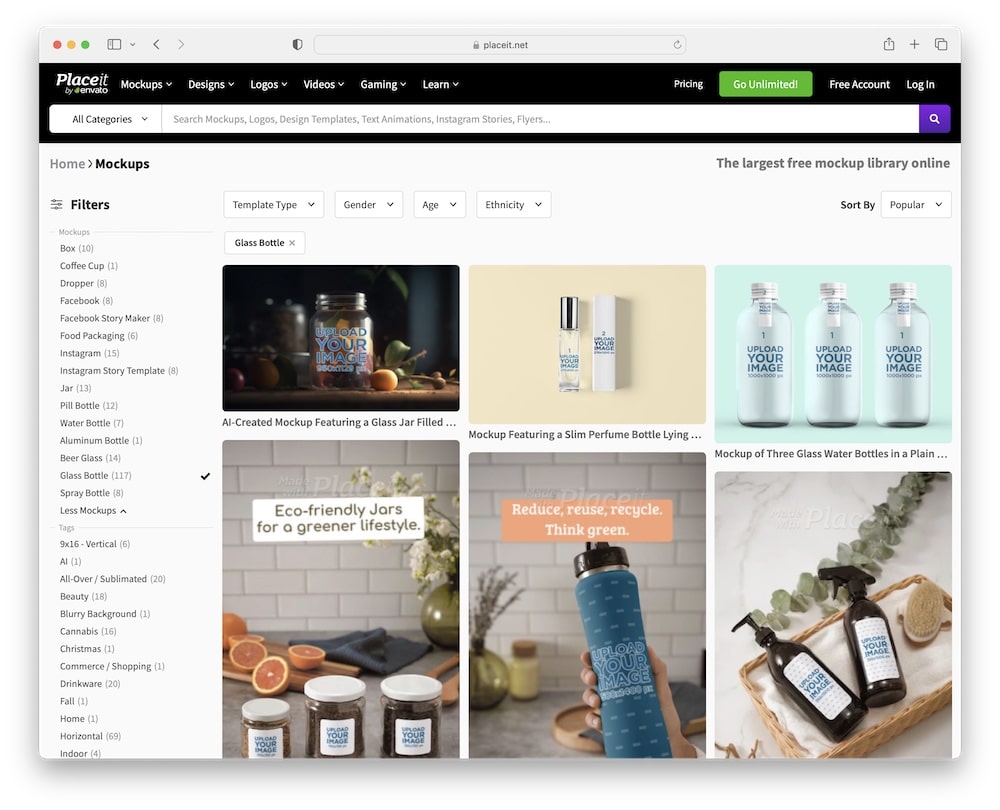
Once on Placeit, locate the search bar and type “bottle mockup” or navigate through the categories to find the mockup section.
You can choose between:
Browse through the available bottle mockup templates.
They have various types of bottles – like water bottles, beer bottles, wine bottles, jars, etc.
Once you find the one that fits your project, click on the template that fits your needs.
Step 3: Customize Your Bottle Mockup
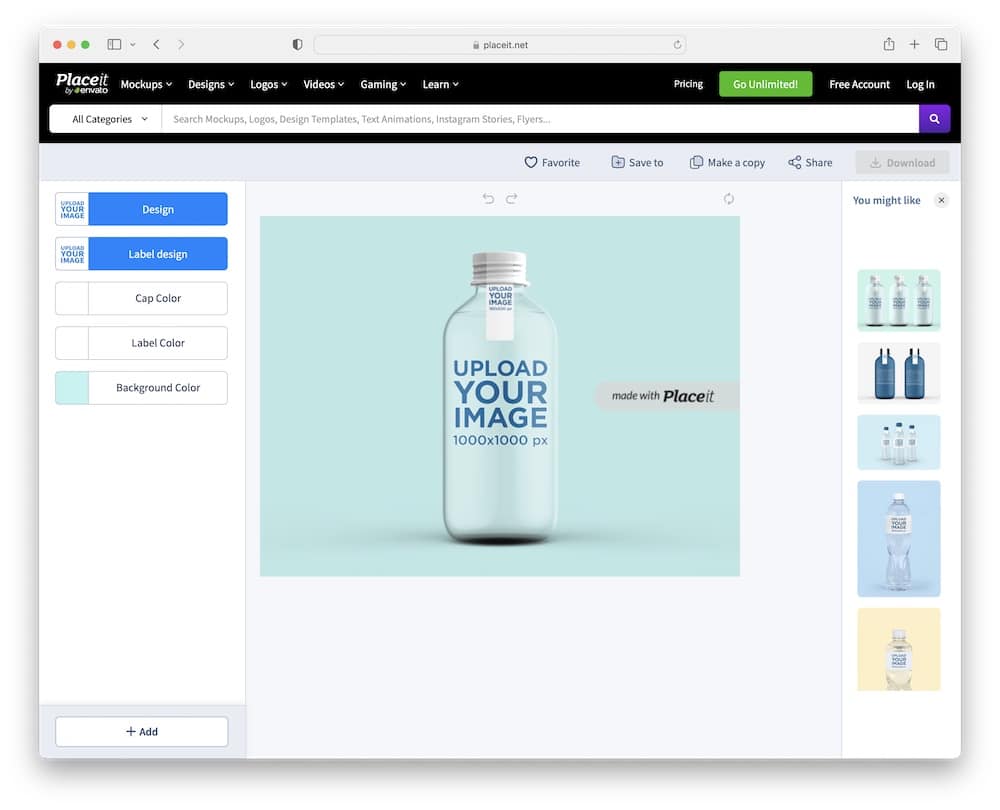
- Upload your design: On the template page, look for the option to upload your bottle label or design. Click on the “Upload Image/Design” button and select your design file from your computer.
- Adjust your design: Once uploaded, you can adjust the size and position of your design to fit the bottle mockup perfectly.
- Customize colors: If the template allows, change the color of the bottle, label or background to match your design or brand.
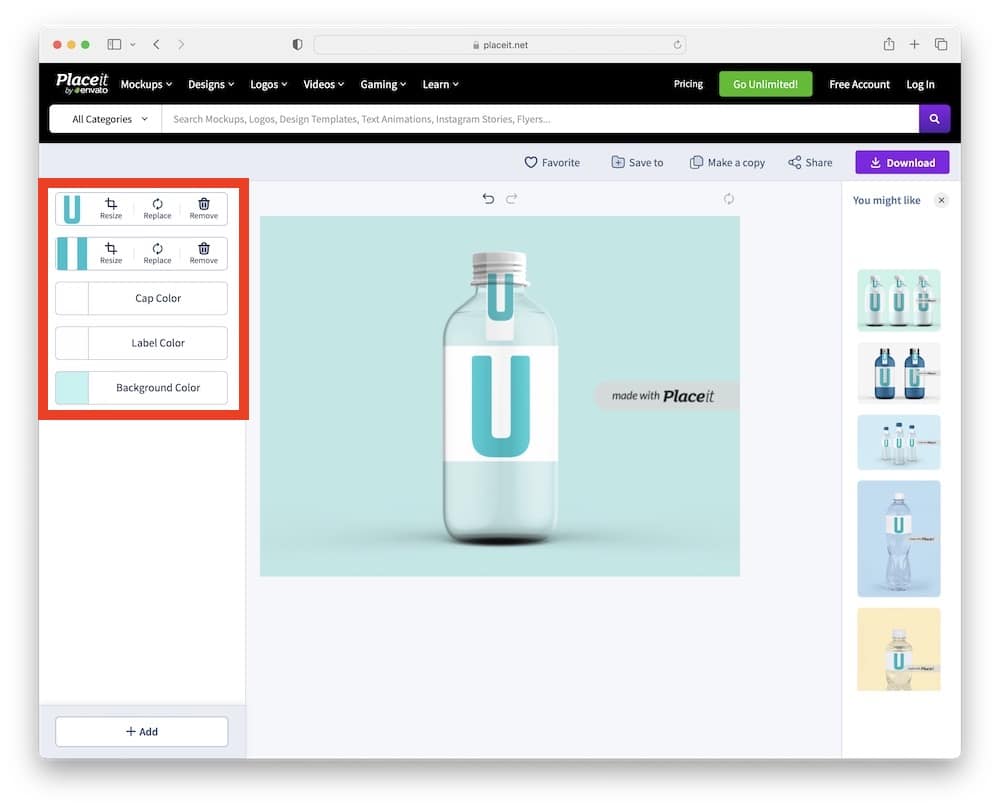
Step 4: Add Text (Optional)
Pro tip: Don’t overcrowd the template!
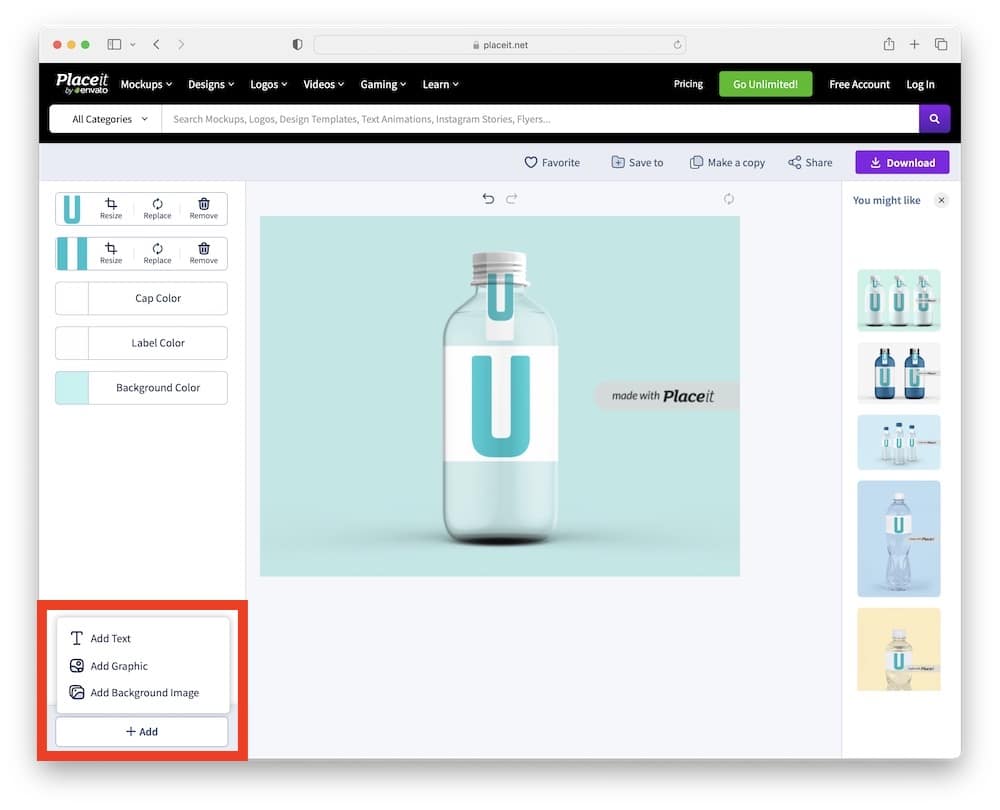
- Insert text: If you want to add text to your mockup, look for the text option. You can add your brand name, tagline, or any relevant information.
- Insert graphic: You can also spice things up by adding a graphic from the Placeit archive or upload your own.
- Customize font, graphic & color: Choose a font style and color that complements your design and bottle mockup.
Step 5: Preview & Adjust
- Preview your mockup: After you’ve added your design and any text, preview the mockup to see how everything looks together.
- Adjust if needed: If something doesn’t look quite right, make any necessary adjustments to your design or the mockup settings.
You can tweak and modify (it’s FUN!) your bottle mockup for as much as you want.
Step 6: Download Your Bottle Mockup
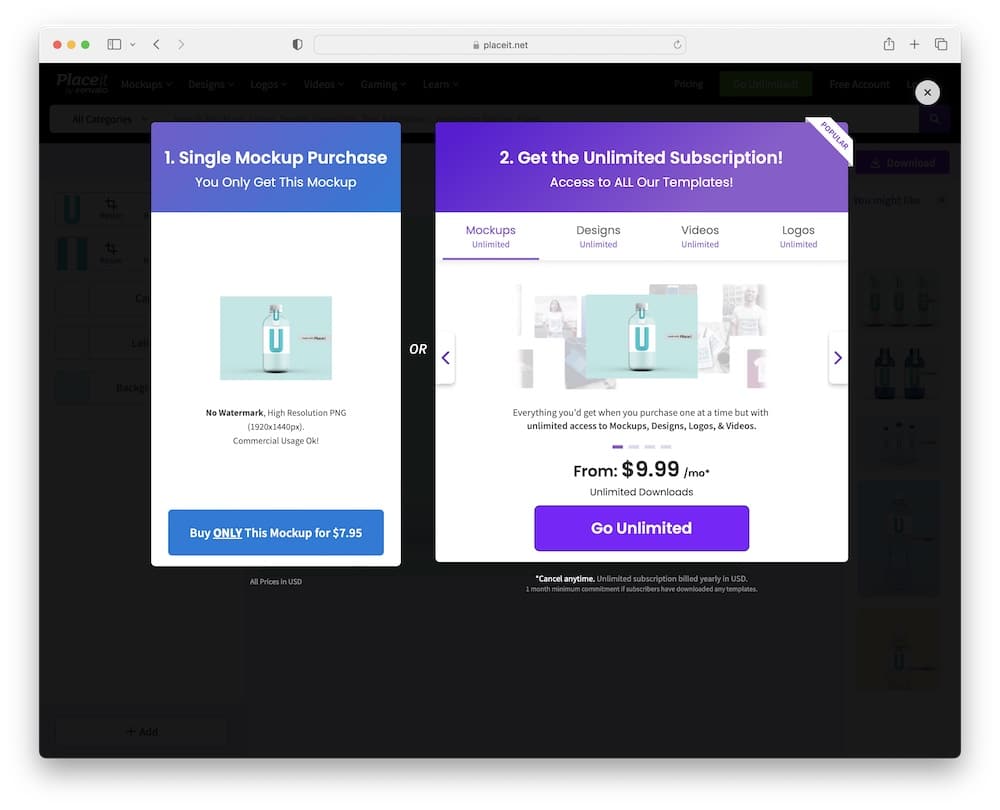
Once you’re happy with how your mockup looks, click on the download button. You might need to sign in or create an account if you haven’t already.
You then have two ways to purchase your epic mockup creation:
- A single mockup purchase that goes for only $7.95.
- Or you can choose the unlimited subscription for $9.99/month. (I prefer the subscription plan because it gives you access to all the mockups, designs, videos, logos, etc.)
Step 7: Use Your Mockup
Now that you have your bottle mockup, you can use it for presentations, marketing materials, social media posts, or any other place where you need to showcase your bottle design.
Tips & Tricks
- High-quality images: Make sure the design you upload is high resolution for the best results.
- Experiment: Don’t be afraid to try different templates and customization options to see what works best for your product.
- Stay consistent: If you’re creating multiple mockups, keep a consistent style for a professional look.
If you need help with selecting templates, check our best-ofs:
- Best cosmetic bottle mockups
- Best perfume bottle mockups
- Best spray bottle mockups
- Best dropper bottle mockups
And that’s it!
You’ve just created a stunning bottle mockup using Placeit.
How To Make A Bottle Mockup With Photoshop
Creating a bottle mockup in Photoshop using a predefined template is a fantastic way to showcase your designs in a realistic setting.
Here’s a concise, step-by-step guide to help you make it happen:
Step 1: Choose & Download & Template
You have 1,000s of options available online.
- Find a template: Search online for a Photoshop bottle mockup template that suits your needs. Websites like Envato Elements, Creative Market, or Behance offer a variety of templates.
- Download: Once you’ve found the right template, download it. Most templates come in a PSD (Photoshop Document) format.
Step 2: Open The Template In Photoshop
- Open Photoshop: Launch Adobe Photoshop on your computer.
- Load the template: Go to “File” > “Open” and select the downloaded layered PSD template file.
Step 3: Familiarize Yourself With The Layers
Explore layers: In the Layers panel, you’ll see several layers and groups. Templates usually have well-organized layers, often labeled for ease of use (like “Replace this,” “Bottle Label,” “Background,” etc.).
Step 4: Insert Your Design
- Find the design layer: Locate the layer or smart object where your design needs to be placed. This is often named something like “Place Your Design Here.”
- Edit the smart object: Double-click on the thumbnail of this layer. It will open a new tab with a placeholder design.
- Place your design: In the new tab, delete or hide the placeholder layer and drag and drop your design. Adjust its size and position to fit properly.
- Save & close: After placing your design, save this smart object (“File” > “Save“) and close the tab to return to the main mockup file.
Step 5: Customize The Mockup
Get creative!
- Adjust layers: If the template allows, you can customize elements like the bottle color, cap color, and background. This is done by selecting the corresponding layers and using tools like the paint bucket, gradient tool, or layer styles.
- Add effects: Some templates have optional effects layers like shadows, reflections, or highlights that you can toggle on or off for more realism.
Step 6: Save Your Work
- Final look: Review your mockup and make any final adjustments.
- Save the mockup: Save your mockup as a PSD file for future editing. To use the mockup in presentations or web, save it as a JPEG or PNG (“File” > “Save As“).
Creating mockups in Photoshop offers a high level of customization and professionalism, allowing your bottle designs to shine.
Conclusion: Master Making Bottle Mockups!
Whether you choose the simplicity and speed of an online mockup generator like Placeit or the versatility and detail-oriented approach of Photoshop with a predefined template, creating a bottle mockup is both accessible and enjoyable.
Each method offers its unique BENEFITS, catering to different skill levels and design needs.
Remember, mockups are powerful tools for visualizing and bringing your designs to life.
They provide a realistic preview of how your product would look in the real world, which is invaluable for marketing, client presentations, or even just to fuel your creative portfolio.
Don’t be afraid to EXPERIMENT with different styles, backgrounds, and designs.
Each mockup you create is a step forward in honing your design skills and understanding what works best for your brand or project.
I hope this guide has been insightful and helpful in guiding you through creating stunning bottle mockups.
FAQs About Making A Bottle Mockup
Do I need professional design skills to make a bottle mockup?
Not necessarily. Online mockup generators like Placeit are user-friendly and require no professional design skills. For more customized mockups, basic knowledge of Photoshop can be helpful.
Can I use any image for my bottle mockup design?
Yes, you can use any image, but it should be high-resolution to ensure the mockup looks professional and clear. The image should also be relevant to the product or branding.
How do I choose the right template for my bottle mockup?
Select a template that closely matches the shape and size of your actual bottle. Also, consider the background and setting of the template to ensure it complements your product.
Are there free tools available for creating bottle mockups?
Yes, there are free tools and templates available online. However, paid versions often offer more features and flexibility.
What file format should I save my bottle mockup in?
For editing and future adjustments, save in PSD format. For sharing and presentation purposes, JPEG or PNG formats are suitable as they are widely compatible and have smaller file sizes.
How can I make my bottle mockup stand out?
Focus on using clean, high-quality images with realistic reflections and shadows. Adding custom backgrounds or scenes that match your brand can also make your mockup more appealing.
Further reading:


