Do you want to learn what is a smart object in Photoshop?
Quick answer: It’s a layer in PS that simplifies how you add your custom designs to create an epic/realistic project – A LOT faster.
But I wanted to create this article to give you a more in-depth explanation, plus teach you how to create a smart object.
Quickly.

(Because so many users and clients asked.)
This post covers:
- What is smart object in PS
- Benefits of using smart objects
- How to create smart objects
- Final thoughts
- FAQs about smart objects
There is no doubt that Photoshop is a powerful program for editing photos and creating graphics.
It has tons of valuable features that allow for creative manipulations. One of those features is smart objects, and they DEFINITELY help you be more efficient.
But what even is a smart object?
I’ll explain what smart objects are, their benefits, and how to create them.
What Is Smart Object In PS
A smart object is a layer in Photoshop file that contains all the same image data from raster and vector images, but it allows you to edit and manipulate those images in a non-destructive way.
For example, you can transform an image or scale it up or down so it won’t lose quality.
So. Cool.
Embedded and Linked Smart Objects
You can embed the contents of an image into a Photoshop document and create an embedded smart object.
You can also create a linked smart object which is a smart object whose contents are pulled from an external image.
With the linked smart object, the contents update AUTOMATICALLY when the source file is changed.
Another benefit of using linked smart objects is that the file size of your Photoshop document will be smaller since they rely on external files instead of embedding them into your Photoshop document.
If you ever move or delete the source file, you’ll need to update your smart object the next time you open it.
Benefits Of Using Smart Objects
There are several benefits of using smart objects when you’re working with Photoshop files:
- As mentioned earlier, you can apply non-destructive transforms to an image without losing quality. You can rotate, distort, skew, transform, or warp a layer.
- You can use vector artwork from Illustrator without rasterizing it first.
- You can apply non-destructive filters and edit filters any time you want.
- You can apply layer masks that are linked or unlinked to smart object layers.
- You can resize the image contained in the smart object without losing quality.
Smart objects are handy when working with mockups.
You can easily add your design to real-life objects to give your clients an idea of how the end product will look. (I use them often!)
How To Create Smart Objects
Now that we’ve covered what smart objects are and why they’re helpful, let’s see how you can create them.
1. How to Create Embedded Smart Objects
There are several ways to create embedded smart objects.
You can open any file as a smart object using File > Open as Smart Object.
You can import files as smart objects by going to File > Place or File > Place Embedded.
Remember that while you can place JPG files, it’s better to use PSD, TIFF, and PSB files because they will give you more editing and modifying options without losing quality.
You can paste your Illustrator artwork onto an open Photoshop document and choose Smart Object in the Paste dialog box. You can also drag artwork from Illustrator onto an open Photoshop document.
Converts Photoshop layer to smart objects
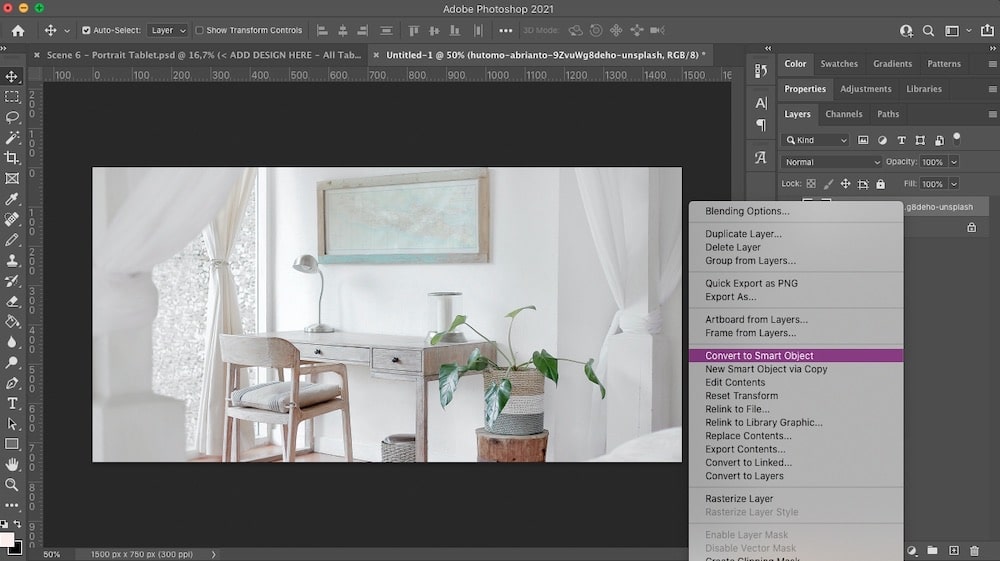
You can convert any Photoshop layer to a smart object by selecting the layer, right-clicking on it and choosing the Convert to Smart Object option.
You can also select the layer and go to Layer > Smart Objects > Convert to Smart Object.
You can convert embedded smart objects to linked smart objects. Select the embedded smart object layer you want to convert in your Photoshop document to do this.
Go to the Layer menu and choose Smart Object > Convert to Linked.
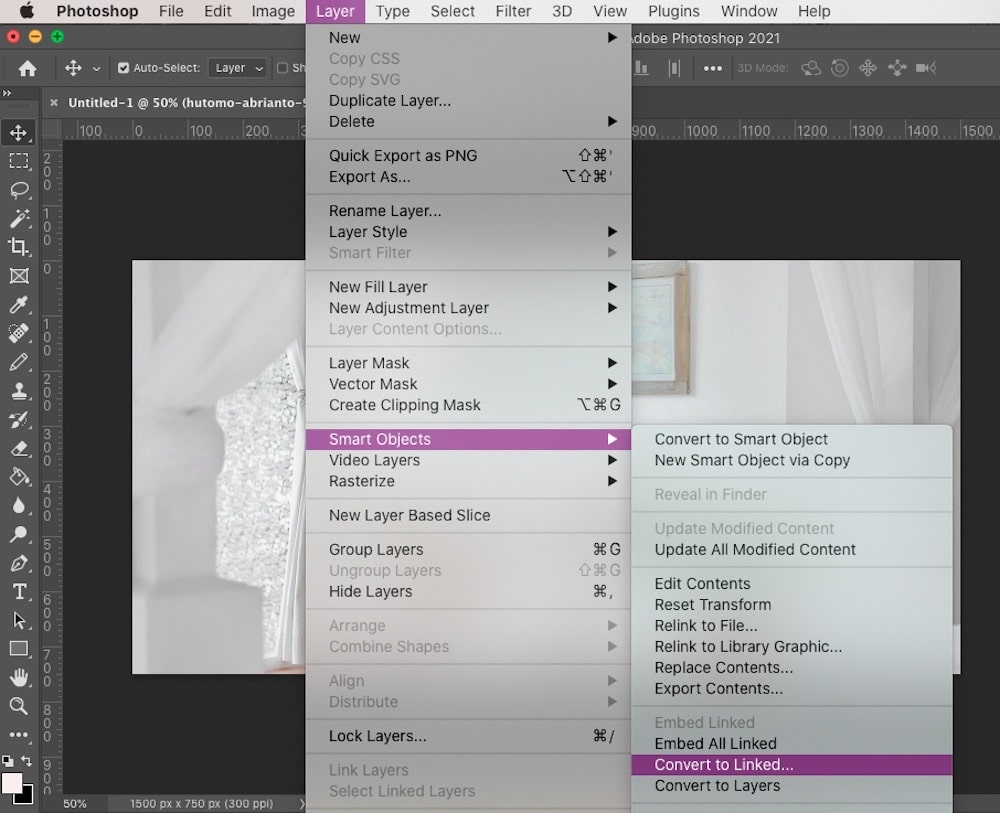
You’ll then need to choose a location on your computer to save your source file. Give it a name and don’t forget to include the format extension, like .jpg.
Click Save and you’ve now converted an embedded smart object into a linked one.
2. How to Create Linked Smart Objects
If you have Photoshop CC, you can also create linked smart objects. Unlike embedded smart objects, there are only two ways to make a linked smart object.
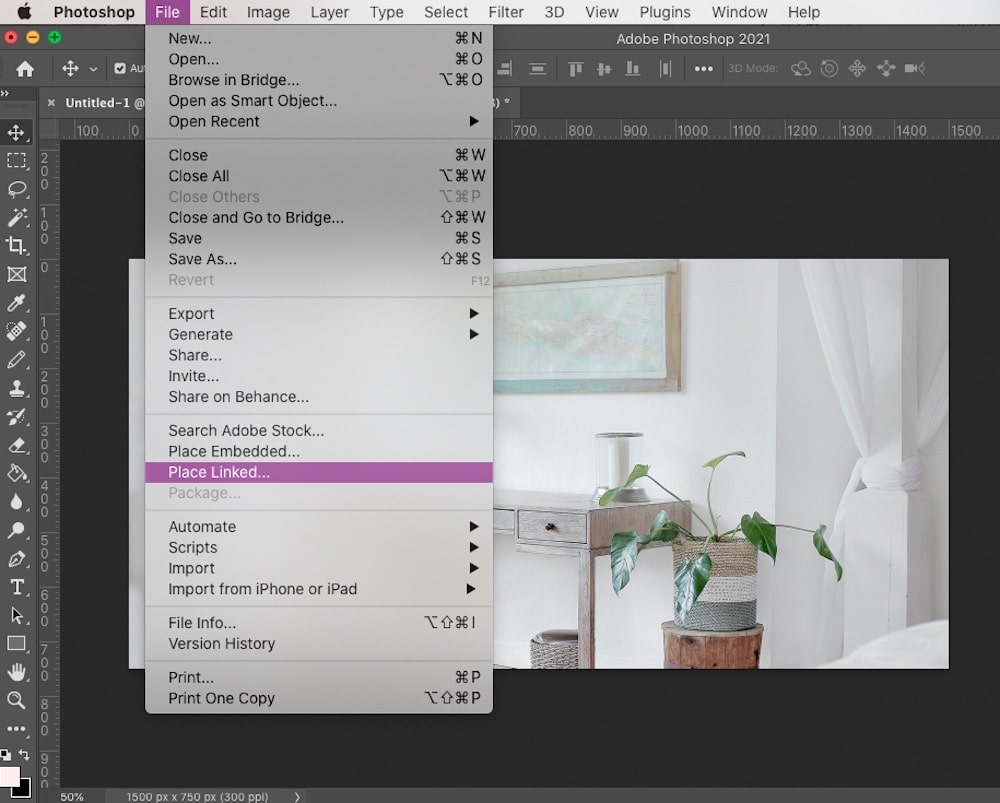
One of them is placing a file onto an open Photoshop document as a linked file. Go to File > Place Linked. Choose the file you want from your computer and click Place.
The other way to create a linked smart object is to drag and drop a file onto the open Photoshop document while holding down the Windows or the Alt key.
Final Thoughts
And there you have it.
After reading this tutorial, I’m sure you’ll know what smart objects are, why you should use them, and how to create them.
The only thing left to do now is to take advantage of smart objects in your next creative project (e.g. mockups).
Good luck!
FAQs About Smart Objects
What are Smart Objects in Photoshop?
Smart Objects are layers in Photoshop that contain image data from raster or vector images, such as Photoshop or Illustrator files. They preserve an image’s source content with all its original characteristics, enabling non-destructive editing.
How do I convert a layer to a Smart Object?
To convert a layer to a Smart Object, right-click on the layer in the Layers panel and select “Convert to Smart Object” from the context menu. Alternatively, you can go to the top menu, select Layer > Smart Objects > Convert to Smart Object.
Can I edit the contents of a Smart Object?
Yes, you can edit the contents of a Smart Object. Double-click on the Smart Object layer in the Layers panel, and it will open a new window where you can make edits.
Why use Smart Objects in Photoshop?
Smart Objects are used for non-destructive editing, allowing you to scale, rotate, and apply filters without losing the original image quality. They are handy for complex editing workflows where preserving the ability to make reversible changes is important.
Can I convert a Smart Object to a regular layer?
Yes, you can rasterize a Smart Object to turn it back into a regular layer, but this process is destructive. To do this, right-click on the Smart Object layer and select “Rasterize Layer” from the context menu. Note that this will eliminate the ability to edit the Smart Object non-destructively.