Do you want to learn what is a WordPress menu and how to create one?
One of the most overlooked yet crucial aspects of any successful website is its menu or navigation.
Yup, that’s right — the HUMBLE menu is your website’s secret sauce for superb user experience and hassle-free navigation.
Imagine entering a restaurant with no menu, just a heap of ingredients scattered everywhere.
Sounds chaotic, right?
A website without a well-structured menu isn’t much different. It can be overwhelming, disorienting, and downright FRUSTRATING for visitors.
A clean, organized menu helps people find what they’re looking for without the digital equivalent of rummaging through a messy kitchen.
In the online world, a great menu is your guiding North Star. It helps your readers journey through your content, steering them smoothly from one page to another.
This post covers:
- What is a WordPress menu?
- Components of a WordPress menu
- How to create a WordPress menu
- How to edit or delete a WordPress menu
- Best practices for creating an effective WordPress menu
- Common WordPress menu issues & solutions
- Conclusion: Master WordPress menus!
- FAQs about WordPress menus
Today, we’re diving into the nitty-gritty of WordPress menus.
We’ll explore what they are, why they’re indispensable, and most importantly, how to set one up yourself—even if you’re an absolute beginner.
What Is A WordPress Menu?
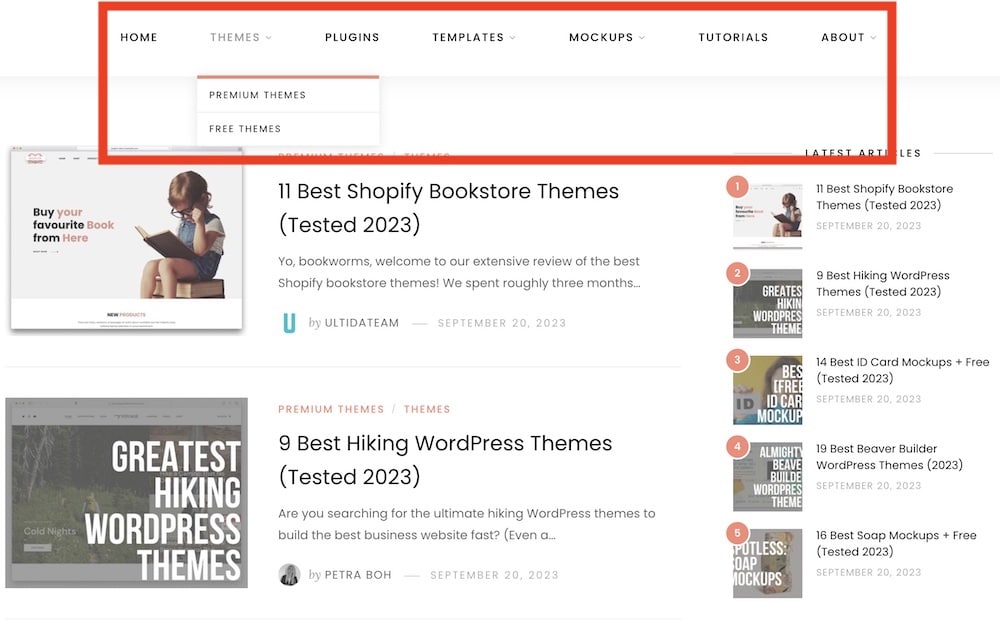
A WordPress menu is essentially a set of links that serve as signposts for your website.
It’s typically displayed at the TOP of your website, but as you’ll soon find out, that’s not the only place it can hang out.
These menus let you link to vital pages like your home page, blog, about page, contact info – you name it!
In WordPress lingo, these links are usually organized into a single row or a column (drop-down), and they can be easily customized to match your website’s theme and vibe.
UNDERSTANDING WordPress menus is crucial for creating a visually stunning and super user-friendly site.
Why Is A WordPress Menu Important
You see, a menu is like the friendly tour guide of your website.
It takes your visitors by the hand and says, “Hey, looking for something? Let me help you find your way!”
Good menus don’t just make your site look organized; they actively HELP people find what they’re looking for.
This boosts user satisfaction, the time people spend on your site, and even your SEO rankings.
A well-crafted menu can help turn casual visitors into dedicated fans — or better yet, customers.
Common Types Of WordPress Menus
Not all menus are created equal, and depending on your site’s needs, you can choose from several types of menus. Let’s break them down:
- Main or primary menu: This is the Big Kahuna, usually found at the top of your website. It’s the first thing people usually see and interact with, so make it count.
- Footer menu: Think of this as your “P.S.” section. It’s usually at the bottom of your website and includes links to essential yet not immediately critical information like privacy policies or terms and conditions.
- Social links menu: In this day and age, who isn’t on social media? This menu is your go-to spot for linking to all your social media profiles. It can be placed in various locations, such as the header, footer, or sidebar.
- Secondary menu: This one’s like the sidekick to your main menu. It’s usually a bit more specific, offering additional links that might not fit into your main menu but are still important.
You’ll also see mentioned terms like mega menu, sticky menu and off canvas menus, but I’ll talk about these later.
Components Of A WordPress Menu
Alright, team, you’ve gotten a taste of what WordPress menus are all about and why they’re the unsung heroes of your website’s navigation.
Now, let’s dive deeper and unwrap the individual components that make a WordPress menu tick.
Are you ready to geek out a bit? I know I am!
1. Menu Items
First off, let’s talk about what goes into your menu.
Think of these as the ingredients in your favorite dish. Each one adds a unique flavor, and when combined correctly, they create something unforgettable.
Pages
Ah, the bread and butter of your menu.
These are links to the core static pages on your website—think “Home,” “About Us,” “Contact,” and so forth.
Simple but oh-so-important.
Categories
If your site includes a blog or an online store, categories are your best friend.
They help organize your posts or products, making it easier for visitors to find what interests them.
Custom Links
Have a link to an external site or a special landing page?
Custom links let you add anything you want to your menu, so go wild but keep it practical and useful.
2. Menu Structure
Parent & Child Items
Think of parent items as the main topics and child items as the sub-topics.
For example, under the Parent item “Services,” you could have Child items like “Consulting,” “Training,” and “Support.”
Drop-down Menus
Drop-down menus are like little treasure chests waiting to be opened.
Hover over (sometimes you need to click it) a parent item, and voila! A list of child items appears.
It’s a neat way to pack more info without cluttering your menu.
3. Menu Locations
Once your menu is ready, where do you serve it? You’ve got options.
Header
This is Menu Prime Real Estate 101, friends! It’s usually the first thing visitors see, so make sure it’s on point.
Footer
As I mentioned before, this is where you place the “P.S.” of your website.
It’s a second home for essential links that don’t need prime placement but should still be accessible.
Sidebar
Sidebars are great for additional navigation or special features. Think of them as the “specials of the day” board you see in restaurants.
However, you can also put your main menu in the sidebar, keeping the header cleaner.
For a complete guide, check how to add a sidebar menu in WordPress.
How To Create A WordPress Menu
So far, we’ve covered the “what” and the “why” of WordPress menus.
But let’s get down to the part that’s probably why you’re here — the “how-to!”
Let’s dive in and create a WordPress menu step-by-step. Ready?
Step 1: Access The Menu Editor
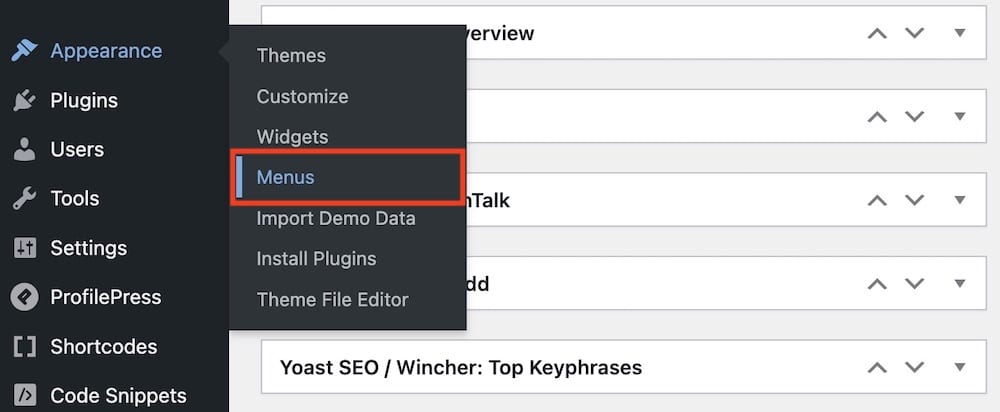
To get the ball rolling, you need to get to where all the menu magic happens: the Menu Editor.
- Login to your WordPress dashboard. That’s your backstage pass to your website.
- Head on over to the left sidebar and find “Appearance.” Give that a click. (You can also hover over it.)
- Now click “Menus,” and—voila!—you’re in the Menu Editor.
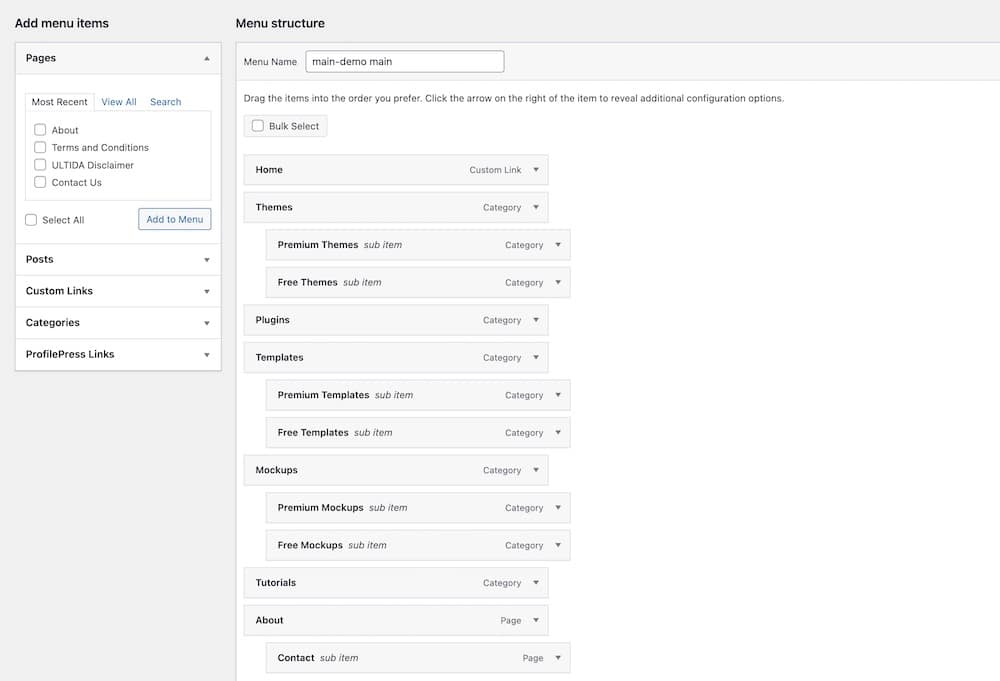
If you’ve never been here before, don’t worry; I promise it’s easier than it looks!
Step 2: Add Menu Items
Now, onto the fun part—adding the items that will make up your menu.
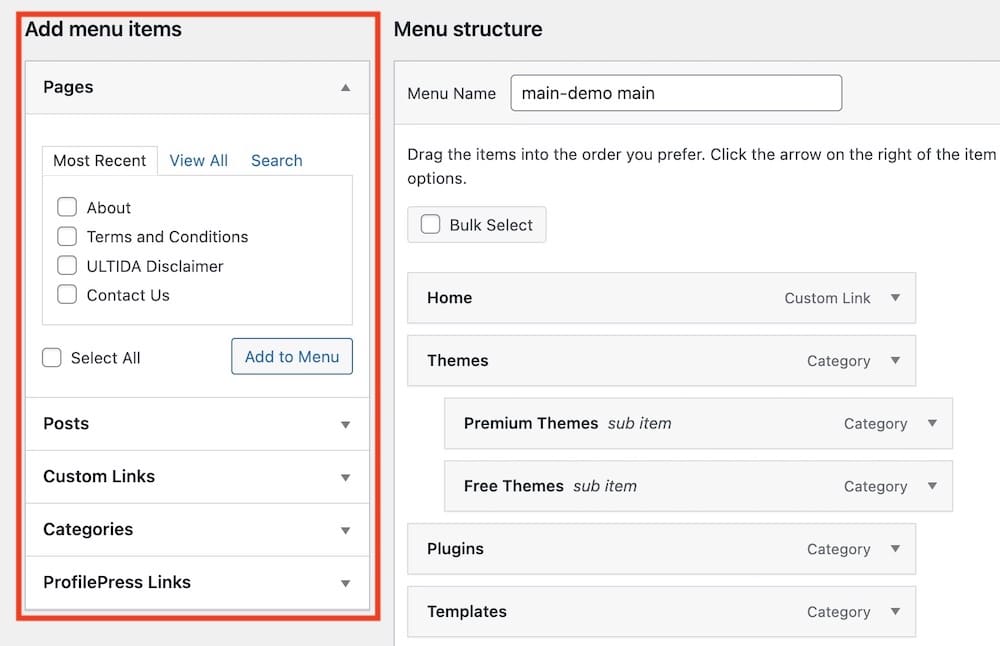
- For pages: On the left, you’ll see a section titled “Pages.” Select the ones you want to add and hit the “Add to Menu‘” button.
- For categories: Same deal—look for the “Categories” section, select what you want, and click “Add to Menu.”
- For custom links: Want to add an external link or perhaps a special anchor link? Under “Custom Links,” paste the URL and label it. Then click “Add to Menu.”
- For posts: Similar to Categories, find the “Posts” section, select your posts, and add them to the menu.
Click, click, click – each time you do, you’re building your menu one item at a time.
Step 3: Organize The Menu Structure
Alright, you’ve added your items, but they’re just sitting there like ducks in a row.

It’s time to give them some structure.
- Parent & child items: To set a parent-child relationship, simply drag an item slightly to the right beneath its intended parent item. It’s like a digital family tree.
- Drop-down menus: If you’ve created parent and child/sub items, congrats! You’ve also created a drop-down menu. Yup, it’s that easy.
Feel free to rearrange as much as you like until it feels just right.
Step 4: Set Menu Location

Last but not least, we need to tell WordPress where to display this awesome menu you’ve just created.
- Scroll down to where it says “Menu Settings.”
- You’ll see some checkboxes with locations like “Header,” “Footer,” and “Sidebar.”
- Check the box where you’d like your menu to appear, then hit the “Save Menu” button. And just like that, you’ve found your menu a home!
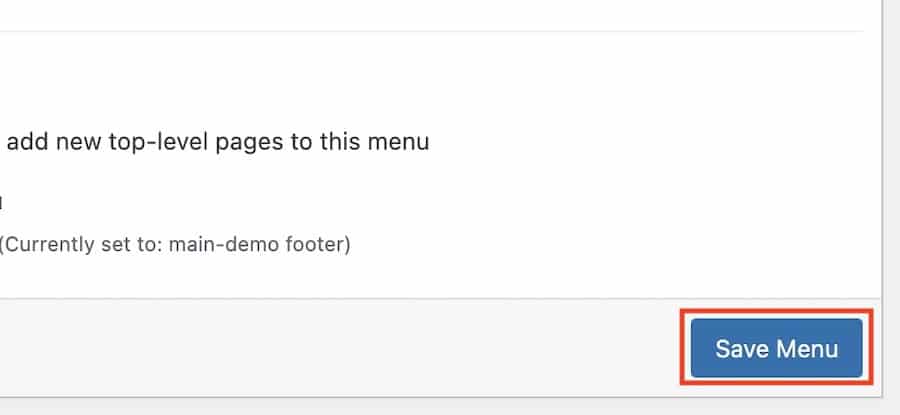
Remember, locations may differ depending on the WordPress theme you use.
Also, themes usually come with predefined menu structures, saving you heaps of time.
And there you have it, folks. You’ve just created a WordPress menu from scratch!
How To Edit Or Delete A WordPress Menu
What if you want to make some changes, or maybe you’ve decided it’s time for a complete do-over?
No worries, I’ve got your back. Here’s how to edit or delete your WordPress menu like a pro.
Editing Individual Menu Items: Small Tweaks For Big Impact!
- Head to the Menu Editor: Yup, you guessed it! Log in to your WordPress dashboard, and go to Appearance > Menus.
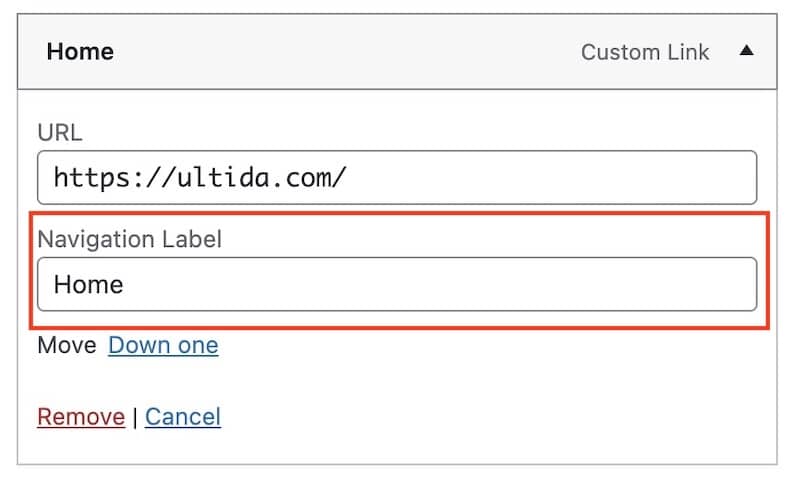
- Find your menu item: In the right-hand section of the Menu Editor, you’ll see all your menu items laid out. To edit, simply click on the little arrow next to the item you want to change.
- Edit away: You can change the Navigation Label, the text your visitors will see. You can also modify the Title Attribute for extra info when someone hovers over the menu item. Once you’re happy with your changes, hit that Save Menu button.
- Reorder if needed: Drag and drop menu items to change their order. Simple as that!
How To Delete Individual Menu Items: Say Goodbye!
- Back to the Menu Editor: You know the drill – Appearance > Menus.
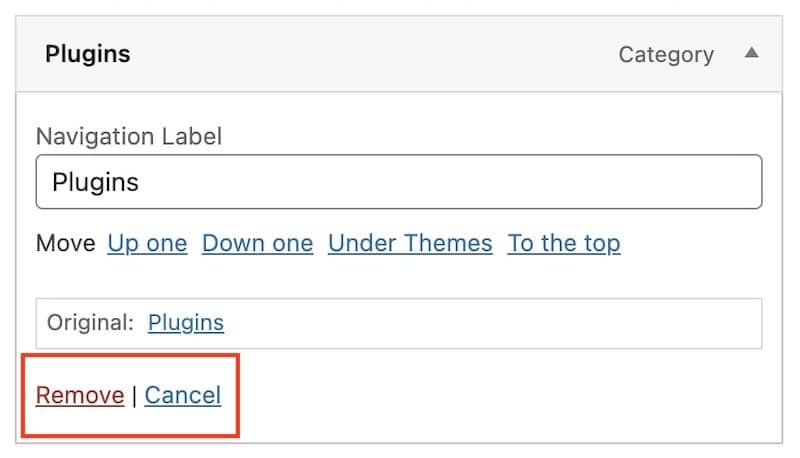
- Identify the offender: Just like when editing, click the little arrow next to the menu item you wish to remove.
- Click Remove: You’ll see a Remove link appear. Give that a click and the item will vanish. Poof! Don’t forget to Save Menu to lock in those changes.
Ready For A Fresh Start? Delete The Entire Menu:
Sometimes, you’ve just got to tear it down to build it back up, right?
If you want to delete an entire menu:

- Navigate to Menu Editor: Yep, it’s Appearance > Menus again!
- Select your menu: At the top, you’ll see a drop-down to select the menu you want to delete.
- Click Delete Menu: Scroll to the bottom to find this option. A pop-up will appear asking if you’re sure. If you are, go ahead and confirm.
- Breathe easy: Your menu is now history. You can start anew or enjoy the newfound simplicity.
Best Practices For Creating An Effective WordPress Menu
You’re not just content with creating a WordPress menu — you want to create an EPIC one.
That’s the spirit!
Let’s transform you from a menu maker into a menu master with these tried-and-true best practices.
1: Limit The Number Of Items: Less Is More!
Picture this: You walk into a restaurant with a 50-page menu. Overwhelming, right?
Your website menu can feel the same way to visitors. Keep it simple and focused.
- Why limit?: Too many options can confuse visitors and make your website look cluttered.
- The sweet spot: Aim for 5-7 main menu items. This makes it easier for your visitors to find what they’re looking for without feeling lost.
2: Logical Ordering: Make It A No-Brainer
Menu items aren’t just thrown in willy-nilly. There’s an art to their placement.
- Natural flow: Think about how your visitors browse. Usually, “Home” comes first, followed by “About,” “Services,” “Blog,” and finally “Contact.” (But the flow depends on the website and the audience – this is just an example.)
- FAQs & important links: Put frequently accessed pages that’re easy to find. If in doubt, “Contact” almost always goes last.
3: Mobile-Responsive Design: On-the-Go Friendly
Your menu needs to look good not just on a desktop but on tablets and phones too.
- Hamburger menus: These are those three horizontal lines you often see on mobile sites. They’re a compact way to hide the menu until needed.
- Test, test, test: Before finalizing your menu, check how it looks on multiple devices. If it doesn’t pass the mobile test, it’s back to the drawing board.
4: Use Clear Text Labels: Say What You Mean
You might be tempted to get creative with your menu labels, but clarity always wins.
- Avoid jargon: Use straightforward language that everyone understands. “Get in Touch” is far more universal than “Commune With Us.”
- Be descriptive: Make sure the label gives a good idea of what the visitor will find on that page. “Shop” is better than “Treasures,” and “Blog” is better than “Musings.”
Common WordPress Menu Issues & Solutions
Even the most seasoned WordPress vets run into issues.
Let’s troubleshoot some common menu problems together, shall we?
1: Menu Not Showing Up
You’ve crafted your menu, saved it, but—uh oh—it’s playing hide and seek.
The fixes:
- Check the menu location: Sometimes, you might forget to assign your menu to a location like the header or footer. Head back to ‘Appearance’ > ‘Menus’ > ‘Menu Settings’ and ensure you’ve checked the right box.
- Theme compatibility: Ensure your theme supports menus. Some older or less feature-rich themes might not.
- Cache & conflicts: Clear your browser cache and deactivate any new WP plugins, then check again. Plugins can sometimes interfere with your layout.
2: Menu Exceeding Theme Space
You’ve added all your items, but now they’re spilling over or stacking weirdly.
The fixes:
- Limit menu items: Sometimes, less is more. Consider condensing or using sub-menus if your menu items are too many.
- Custom CSS: If you’re comfortable with CSS, you might tweak the style to make items fit better. But tread carefully!
- Switch themes: Some themes offer more header space for menus. If your menu is a central part of your site, it might be worth switching to a more accommodating theme.
3: Menu Not Mobile-Friendly
Your menu looks fabulous on desktop but is a mess on mobile.
The fixes:
- Responsive check: First, ensure your theme is mobile-responsive. If it’s not, you might want to consider switching to one that is.
- Hamburger helper: Use a hamburger menu for mobile views. This will condense your menu into a small icon, expanding only when tapped.
- Test extensively: Before calling it a day, check your menu on various devices to make sure it’s truly mobile-friendly. There are online tools that can simulate different devices for you.
Conclusion: Master WordPress Menus!
Hey, you made it to the end—HIGH FIVE!
But let’s be real, your journey with WordPress menus is just beginning.
From understanding what a WordPress menu is, to mastering the art of creating, managing, and even troubleshooting one—you’ve covered a lot of ground.
We’ve delved into:
- What a WordPress menu is: The backbone of your site navigation, helping users find what they’re looking for effortlessly.
- How to create & manage a menu: From the Menu Editor under ‘Appearance,’ you’ve learned to add, organize, and set menu items and structures. It’s your canvas, and you’re the artist!
- Best practices: Limiting menu items, ensuring they’re logically ordered, making them mobile-responsive, and using clear text. These aren’t just tips; they’re your recipe for success.
- Troubleshooting: When things go sideways, you’ve got the tools to make them right—whether the menu’s not showing, exceeding the theme space, or not being mobile-friendly.
Your website is a living, breathing entity, and your menu is no different. Don’t be afraid to tweak, experiment, and optimize.
Remember, a great menu doesn’t just make your site look organized – it elevates the entire user experience, guiding visitors seamlessly through your content.
And you, my friend, are now equipped to create a menu that does just that.
Further reading:
- How To Create A Multilevel WordPress Menu
- Best WordPress Menu Plugins
- Best WordPress Mega Menu Plugins
- Best Mega Menu WordPress Themes
- Best WordPress Themes With Sidebar Menu
FAQs About WordPress Menus
What is a primary menu in WordPress?
In WordPress, the primary menu is the main navigation menu that usually appears at the top of your website, often in the header area. It serves as the go-to guide for visitors, providing quick access to the most important pages and categories on your site.
What is an off-canvas menu in WordPress?
An off-canvas menu in WordPress is a type of navigation that is hidden off-screen and only appears when triggered by a button, commonly a “hamburger” icon. This space-saving design is especially useful on mobile devices, where screen real estate is limited, allowing for a cleaner and more focused user experience.
What is a secondary menu in WordPress?
In WordPress, a secondary menu is an additional navigation menu that usually appears in areas other than the main header, such as the footer or sidebar or even below the primary menu. It’s often used for supplementary links like “Contact Us,” “FAQ,” or social media icons, providing extra navigational options without cluttering the primary menu.
What is a mega menu in WordPress?
A mega menu in WordPress is an expansive drop-down menu that offers multiple options, including links, images, and even widgets, all organized into categories or columns. Unlike a standard drop-down menu that provides a simple list of links, a mega menu allows for a more complex and visually rich navigation experience. Check this guide to learn how to create a mega menu in WordPress.
What is a sticky menu in WordPress?
A sticky menu in WordPress is a navigation menu that remains fixed at the top of the screen as the user scrolls down the page. This ensures that the menu is always accessible, providing a more convenient and user-friendly browsing experience. (See how to create a sticky menu in WordPress easily.)
How do I create a new menu in WordPress?
To create a new menu in WordPress, go to your WordPress dashboard, navigate to “Appearance” and then “Menus.” Click on “create a new menu,” give it a name, and click “Create Menu.” You can then add pages, categories, and custom links to the menu and arrange them as needed.
Can I add custom links to my WordPress menu?
Yes, you can add custom links to your WordPress menu. In the menu editor, select “Custom Links” from the options on the left, provide the URL and link text, and click “Add to Menu.” You can then position the link in your menu as desired.
Is it possible to create multi-level dropdown menus in WordPress?
Yes, WordPress allows you to create multi-level dropdown menus. When adding items to your menu, you can drag and drop them to arrange under parent menu items. Place the cursor slightly to the right under a parent item to make it a sub-item, creating a nested, dropdown effect.


