You just set up WordPress, and now you’re interested in how to install a WordPress plugin.
BEEN. THERE.
It’s way easier and quicker than you think!
WordPress rocks by itself but there’s no extended WordPress functionality without WordPress plugins.
WordPress plugins can do everything, from simple design improvements to complex booking systems, page builders, visually enhanced sliders, and more.
And that’s why it’s ESSENTIAL to know how to activate and install it.
This post covers:
- How to install a free WordPress plugin
- How to install a paid WordPress plugin
- How to manually install a WordPress plugin via FTP
- What to do with inactive plugins
- How do I uninstall a WordPress plugin
- FAQs about installing WordPress plugins
Let’s get right into it.
Friendly tip: I recommend using a WordPress backup plugin any time you do edits to your website to avoid inconveniences.
How To Install A Free WordPress Plugin
Attention: Before starting, it’s important to note that this tutorial is about installing WordPress plugins for self-hosted websites. It’s not suitable for websites built on WordPress.com website.
When you would like to add some slick features or functionalities to your website, there is almost ALWAYS a (free) plugin for that.
Step 1: Visit WordPress Plugin Directory
Head over to the WordPress plugin repository and search for the plugin you need.
I always find the right one, thanks to the almost 60,000 active plugins.
And I know you’ll, too!
Access Plugins From Your WP Dashboard (More Practical)
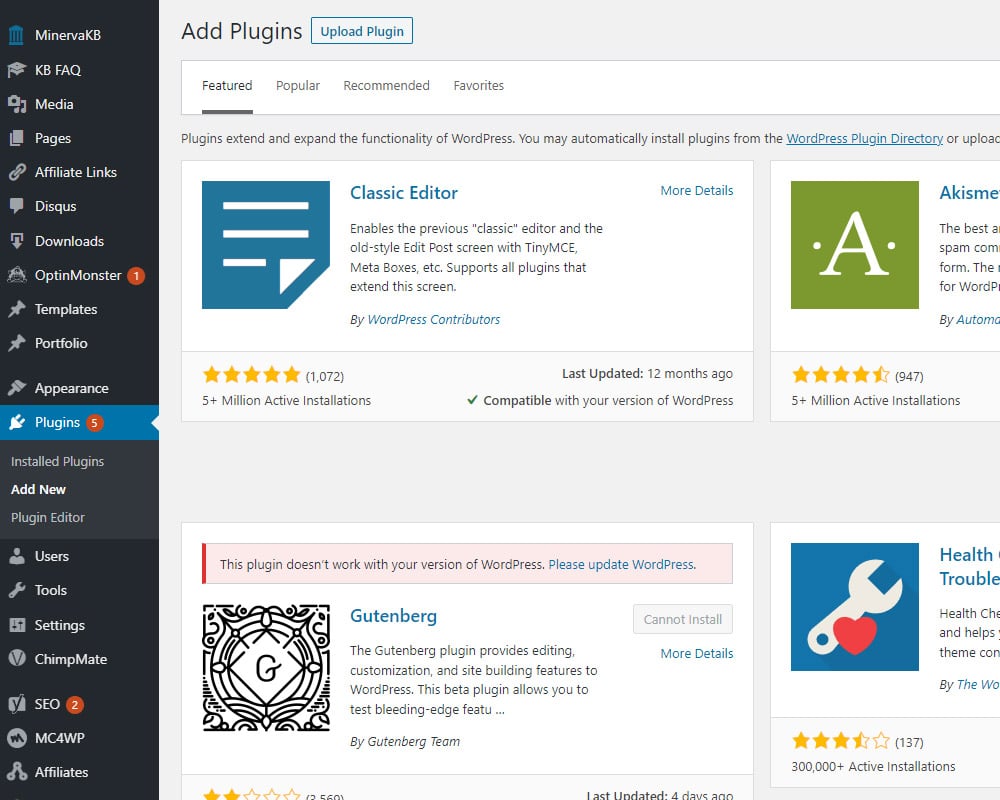
Go to Plugins (in the left sidebar) > Add New page inside your WordPress admin area.

You will see a screen like the one on the screenshot above.
Step 2: Search For Your Plugin
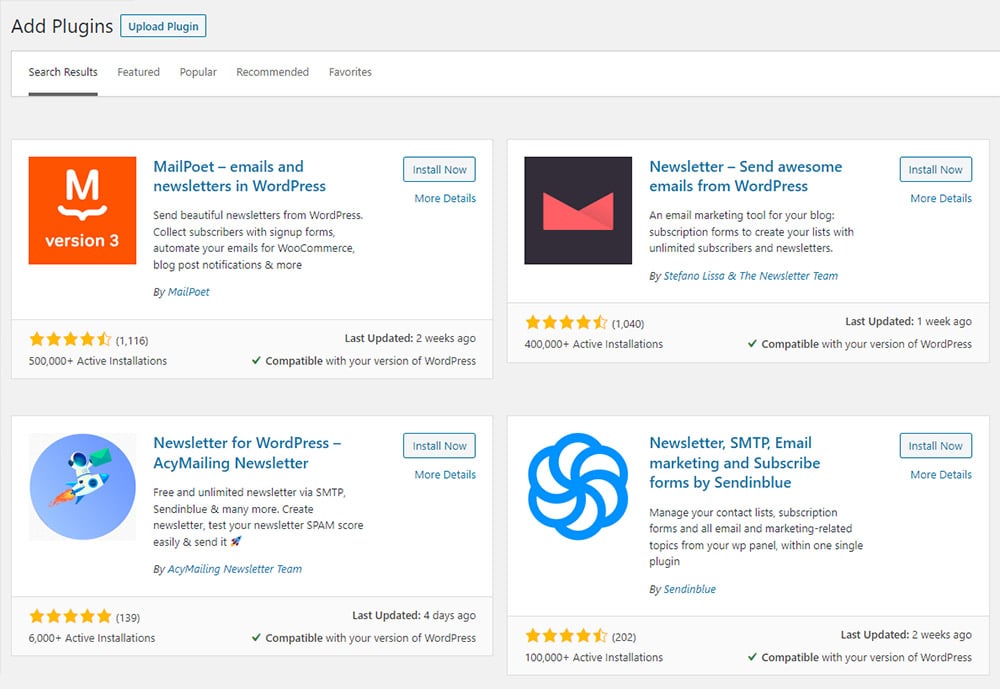
Start typing the functionality you need, like: “Newsletter.”
You will get a list of all the plugins that provide the desired functionality.
Important: Pay attention to the plugin ratings and active installs. That’s how you ensure the plugin’s quality is high.
Also, check when the plugin was LAST UPDATED because this ensures compatibility with your current WordPress version. (Don’t pick outdated ones!)

Step 3: Install & Activate The Plugin
After you choose the appropriate plugin click Install Now button.
The label of the button will change to Activate after a few seconds.
It means that the plugin is installed but won’t yet function properly without activation.
Proceed by clicking the Activate button and you are ready to go.
The plugin is now successfully installed, activated, and ready to use.
You can now go to the plugin’s settings and START configuring it to your needs.
Every plugin is different in this regard, so we will not be covering it in this article.
Note: Some plugins appear as an extra section in the left sidebar and some under “Settings.” (So you won’t search for it like I did when I started with WordPress.)
How To Install A Paid WordPress Plugin
The best and most complex WordPress plugins are usually not free.
1. Get The Plugin

You can find the most advanced WordPress plugins like SliderRevolution on CodeCanyon.
It’s a paid repository with almost 5,000 plugins, with new ones added daily.
These plugins go through a rigorous approval process to guarantee they’re safe to use.
Authors also update them frequently, which is absolutely NECESSARY. (A plugin that’s not updated can lead to a website crash.)
The procedure for installing these plugins is slightly different.
2. Upload The Plugin
Go to Plugins > Add New page inside your WordPress admin area.
Instead of typing the name or functionality of the plugin, click on the Upload Plugin button and upload the plugin’s zip file.
(You download (to your computer) this file after you purchase the plugin on CodeCanyon (recommended).)

This will open the plugin upload form. Click on the Choose File button and select the plugin file you’d like to upload.

3. Install The Plugin
Select the file and click on the Install Now button.
WordPress will upload the plugin from your computer and install it for you. You will see a SUCCESS message after the finished installation.
4. Activate The Plugin
The only step left is to activate the plugin, just like in the case of installing plugins from the WordPress repository.
That’s it!
I told you it’s easy and quick.
You can now start setting up your plugin and let it ENHANCE your website.
Paid plugins come with great documentation & dedicated support
Plugins from CodeCanyon come with thorough (professionally written) documentation to guide you through the setup process.
The most advanced ones (like Slider Revolution) also have their own blog, tutorials, help center, FAQ, videos, etc., that’ll answer all your questions.
I highly recommend opting for a premium plugin if you are not tech-savvy. (The price is well worth it.)
How To Manually Install A WordPress Plugin Via FTP
This is an OLD way of installing and activating WordPress plugins.
Most users will never use it, but it’s still worth being familiar with it.
Sometimes, your hosting provider might limit your ability to install a plugin from the administration panel.
For instance, there might be a 2MB size limitation set on your hosting, which would prevent the installation of most paid plugins.
In this case, you will have to install the plugin via FTP.
Install A Plugin Via FTP (Step-By-Step)
This method is the most user-friendly:
- Download the plugin from the WordPress repository or Codecanyon to your computer.
- Extract plugin’s zip file into a folder on your computer.
- Install a FTP client like Filezilla
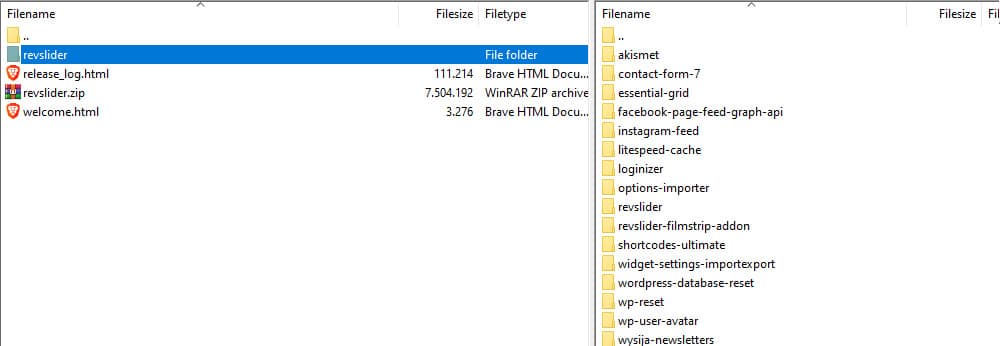
- Connect to your host through the FTP client. You need your FTP username and password for that. (Contact your hosting if you don’t have them.)
- Once connected to your website through the FTP client navigate to
/wp-content/plugins/folder - Upload the folder you extracted from the zip file to the
/wp-content/plugins/folder on your web server. (You can also just drag-n-drop it.)

Install & Activate The Plugin
After it’s uploaded to your website, you need to ACTIVATE it, just like when uploading via the administration panel.
Go to your WordPress and click on the Plugins tab on the left.
There it is!
Click on the activate button to finish the installation and start using the plugin.

Debugging plugins with FTP
FTP is also suitable for debugging plugins.
If, for some reason, the website crashes after the activation of the plugin, you can lose access to your administration panel.
For instance, you can get the infamous white screen of death.
There is NOT MUCH you can do in this case if you don’t have FTP access to your website.
But it’s very easy to fix it if you do.
Go to the /wp-content/plugins/ folder and delete the plugin you just installed.
The website will return to normal and you won’t get any grey hair.
(A few of my clients and I experienced this so that you don’t have to.)
What To Do With Inactive Plugins
I RECOMMENDED deleting plugins you don’t use. Inactive plugins will not slow down your website, but they still take space on your hosting.
There is no reason to keep them (unless you intend to use them later).
Inactive plugins are mostly harmless, but these files can be breached in case of a hacking attempt.
Especially if it has been sitting there for a long time and is OUTDATED for months or even years (!).
It’s a WordPress security measure that you delete all inactive plugins.
How Do I Uninstall A WordPress Plugin

Uninstallation of a WordPress plugin is a SIMPLE procedure.
Visit the Plugins page in the WordPress admin area.
If the plugin is currently active, you need to first deactivate it before you can delete it.
After that, click the Delete button to remove the plugin from your website altogether.
And we’re done.
You should now be able to install, active, uninstall and delete your plugins comfortably.
It’s now time to put your creativity in motion and start building EPIC websites.
FAQs About Installing WordPress Plugins
How do I install a WordPress plugin?
Go to your WordPress dashboard, click on “Plugins” > “Add New,” search for the plugin by name, click “Install Now,” and then “Activate.”
Can I install a WordPress plugin via FTP?
Yes, you can upload the plugin’s directory to the `/wp-content/plugins/` directory via FTP, then go to your WordPress dashboard to activate it.
Why can’t I install a plugin on my WordPress site?
It could be due to several reasons: Your WordPress hosting plan might limit plugin installation, you don’t have the necessary user permissions, or there are file permission issues on your server.
How do I update a WordPress plugin?
Navigate to “Dashboard” > “Updates” or “Plugins” > “Installed Plugins” and click the “Update Now” link if an update is available for your plugin.
Can installing a plugin break my WordPress site?
It’s possible if there’s a compatibility issue with your WordPress version, a conflict with another plugin, or if the plugin is poorly coded.
How do I install a premium WordPress plugin?
Download the plugin from the source, then go to “Plugins” > “Add New” > “Upload Plugin,” select the .zip file, install it, and activate it.
Should I backup my WordPress site before installing a plugin?
Yes, it’s always a good practice to back up your site before installing or updating plugins to avoid data loss in case of errors.
Can I install a WordPress plugin on a free WordPress.com site?
No, free WordPress.com sites do not allow the installation of plugins. You’ll need to upgrade to a Business plan or switch to a self-hosted WordPress.org site to use plugins.
What should I check before installing a WordPress plugin?
Before installing a plugin, check its compatibility with your version of WordPress, read recent user reviews, and ensure it’s regularly updated. Also, confirm that the plugin has good support options.


